
Pressure Canning…..does that cause fear to run it’s icy fingers down your back? The idea of something sitting on your stove boiling to un-godly temperatures with pressures that exceed normal atmospheric levels? It did for me. The thought of pressure canning made me nervous and scared. I’m not really sure why I was nervous about it. I’ve never had any bad experiences with pressure canners in my past. I think it was the fact that I’d NEVER used one, nor had I ever seen anyone use one, that caused me to fear the unknown.
Now, please know that I am not talking about pressure cookers. Pressure cookers are never to be used for canning. Pressure canners are large pressurized kettles that allow you to can low acid foods in temperatures that exceed what could ever be possible with boiling water. By increasing the pressure inside the canner with a heat source, the temperature increases as well. Here’s a little chemistry for you at no extra charge!
Gay-Lussac’s Law of temperature and pressure states that if the volume (the size of the canner) and the amount of gas (steam) stay the same, an increase in temperature will increase pressure. It works in reverse as well. As the pressure inside the canner increases, the temperature also increases. These temperatures are high enough to kill the spores that cause botulism: provided you pressure can your food to the specific pounds of pressure for the amount of time recommended.
Pressure canning is indicated for low acid foods. Some examples of low acid foods are corn, squashes, meats and so forth. Low acid foods do not contain enough acid to keep food spoilage from happening. And unless you are pickling or jamming a low acid food by adding acid and/or salt or sugar, pressure canning is necessary.
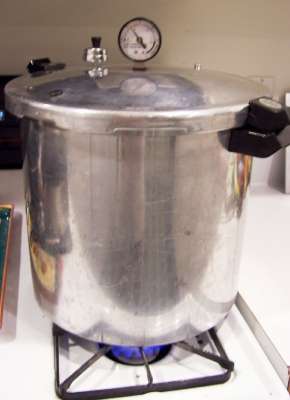
This is a pressure canner. Pressure canners can look differently, but essentially, they have the same equipment. It needs to be large enough to hold quarts, pints, and even smaller jars. This type of pressure canner is not recommended for using tin cans. That is a whole other method all together. So in this article, I am referring to glass canning jars made by Mason or Ball.
In the very center of the lid of the canner is a dial. This is the pressure gauge.

This allows you to accurately know how many pounds of pressure are inside your canner. Each fruit, veggie, meat or whatever you choose to pressure can has a recommended poundage and processing time based upon your elevation. Many recipes will indicate pounds of pressure and processing time based upon sea level. It’s important to know your elevation and make adjustments accordingly. Usually, if you buy your canner new, it will come with elevation adjustments within the instructions. It’s very important to read all the instructions that come with a pressure canner before you ever use it. If you don’t have the instructions for your canner (say you bought it used or it was a family member’s) it is possible to look up the instructions online now. It’s also very important that you have your pressure gauge calibrated each canning season. You can have this done by calling your local county extension office
Each pressure canner will have a lid that locks into place. Most new models have a small air vent cover lock. In the photo above, you can see a small silver button that’s popped up to the right of the gauge. When the pressure inside the canner begins to pressurize and exceed safety limits for opening up the lid, this cover lock acts as a safety lock. It pops up and locks the canner so that no one can open it while there is pressure inside the canner. Also, when all the pressure has been released after processing time is up, this button will fall back down into place to let you know it is now safe to open the canner.
To the left of the gauge in the photo above is the vent pipe and on top of that sits the pressure regulator.

Usually the regulator does not sit on top of the pipe until steam has been allowed to vent for at least 10 minutes. After that time, the regulator is placed over the pipe and that’s when the gauge begins to monitor the pounds of pressure within the canner. Processing time does not begin until recommended pounds of pressure is achieved. Always make sure you can see through the vent pipe ahead of time and that nothing is blocking it before you begin anything. You can do this by simply holding the lid up and looking through the pipe!
Did I overwhelm you? Lots of information isn’t it? That’s how I felt when I first read about pressure canning. But it’s very important to understand all the features of a pressure canner before you use it. However, I assure you, once you pressure can once, it all makes sense. Luckily for you, I have condensed pressure canning down to step by step instructions you can easily follow and not feel overwhelmed. Trust me!
Beth’s Super-Condensed Fabulous Easy Wonderful Great Pressure Canning Instructions
(Ok, so I went overboard on the adjectives. I can’t help it. I thought perhaps it would help ease you into the process a little. Did it? Do I need to add more adjectives? Let me know.)
Step One: Prepare the food you plan to pressure cook according to your recipe instructions. Make sure you clean and sterilize your jars, lids and rings.
Step Two: Depending upon the size of your pressure canner, add the recommended amount of water to the canner before adding your jars. Add about 2 tablespoons of vinegar to help prevent white residue on jars.

Step Three: Place your jars into the canner making sure the sides of the jars do not touch. Also, do not mix your jars, ie. quarts and pints together. Only process pints only, or quarts only.
Step Four: Place the lid of your canner in place and lock it by twisting until locked according to the manufacturers instructions. Mine has arrows that must align. Make sure you do not have the pressure regulator on the vent pipe just yet. Then turn on the stove. I turn my burner on high. Soon, steam will emit and you need to allow a steady stream for at least 10 minutes or per manufacturer’s instructions.
Step Five: After 10 minutes, place the pressure regulator over the vent pipe and you will see the gauge needle begin to rise. Allow it to rise to the suggested pounds of pressure, then adjust the heat on your burner to maintain that pressure. Once it’s at the correct pounds, begin timing your processing.
Step Six: Stay near your pressure canner while processing. You can leave the room briefly, but it’s important to check the gauge frequently to make sure the pounds of pressure is staying steady. If you have a gas stove, this can be difficult if you have a drafty kitchen. So stand by and check often!
Step Seven: Once processing time is up, turn off your burner and remove canner from heat source. If you have gas stove, you can leave it there, but if you have an electric stove, you will need to carefully slide it over. Please take care when you do this! Then leave your canner alone to de-pressurize on it’s own. NEVER ATTEMPT TO OPEN A PRESSURE CANNER WHILE THERE IS STILL PRESSURE!! This can cause serious injury. Once the cover lock pops back down, you can carefully open your canner facing the lid away from you as you open to prevent any remaining steam from burning your face or arms.
Step Eight: Remove jars from canner and allow to cool to room temperature. This could take overnight at times. Be patient! Don’t remove your rings until the jars are completely cool!
*****
Alright…do you feel confident to try pressure canning? I really hope so. My desire in my how-to articles is to make sure everyone has enough confidence to try something new. I have literally fallen in love with my pressure canner because it just made canning so much easier. It uses less water, the kitchen isn’t so hot and my jars almost always seal without fail. Happy Canning!!
Beth spends most of her time blogging at her personal blog Coming Up For Air, where she’s up to her eyeballs in harvest right now and literally dreams at night about sterilizing jars and skinning endless tomatoes! Come on by!
This is an original 5 Minutes for Going Green post!
Love, love this. Have been pondering wanting to can stuff but a little intimidated by the process. Do you also have thoughts on dehydrators?! Thanks!
Jessica- I chose not to dehydrate foods this year. My main reason being I just felt I wasn’t informed enough to make a decision in purchasing a food dehydrator. Then I began reading about solar dehydrators and we may be going that route next season.
I think dehydrating foods is another great way to preserve your harvest! I definitely plan on adding it to my efforts….I just didn’t do it this year! :)
Okay, I got the pressure canner, but so far I’ve only used it as a boiling water bath for jams. I’m confused because I’ve seen recipes for tomato sauce to be processed in the pressure canner – and still call for additional lemon juice. I thought the point of pressure canners was you didn’t need to add extra acid? (BTW, these recipes are in the Ball Blue Book of Canning).
Any advice?
All canning of tomatoes, whether B-W bath or pressure canned have to have acid added because they are a low acid food. No matter what type of tomato you use, the acid level for any canning should be minimum 4.6 acidity. This or lower would warrant that B-W bath would be fine. If you are not sure, pressure canning is necessary. Pressure canning does not allow you skip acidifying your foods. However, pressure canning can cause the texture of your tomatoes to be mushy and so proper acid addition is necessary and B-W bath would be fine. Pressure canning is the only effective way of killing the spores that can cause Botulism. So if you are not sure of the acidity of your food, then pressure canning is important. I err on the save side when I can and I do pressure can tomato sauce. But I think if I was going to can tomatoes stewed or whole, I might B-W bath them and make sure I add the proper amount of acid to keep them safe. My recipe for tomato sauce did have lemon juice added and honestly, I would rather be safe than sorry! :)
Hope this was helpful!
I need to clarify that many tomatoes have been bred to be high acid or low acid. So it’s important that you know for sure before you decide what type of canning method you will use. I tend to assume they aren’t and add what the recipe calls for! :)
Happy Canning!
I’ve been canning with just the boiling water method for years now and I REALLY want to get one of these, but I have always been a little leary. Now I really want to be able to can more veggies and stuff!
Thanks,
Heidi
Thanks for the clarification, Beth – that was very helpful!
I admire people who can their own produce. It’s funny, I was just blogging about that the other day.
Have pressure canned my garden produce for years now and suggest that the times for the product to be at pressure be strictly adhered to, preventing possibility of food poisoning – otherwise, happy canning!